How to Use Timesheets
Step-by-step guide to import, process, and manage construction worker timesheets for accurate payroll and project billing
What This Feature Does
The timesheet management system imports and processes worker time records from various sources (Assignar Operations, CSV files, accounting systems), automatically calculates rates using Schedule of Rates, and prepares data for payroll and client invoicing.
Initial Setup
First-Time Configuration
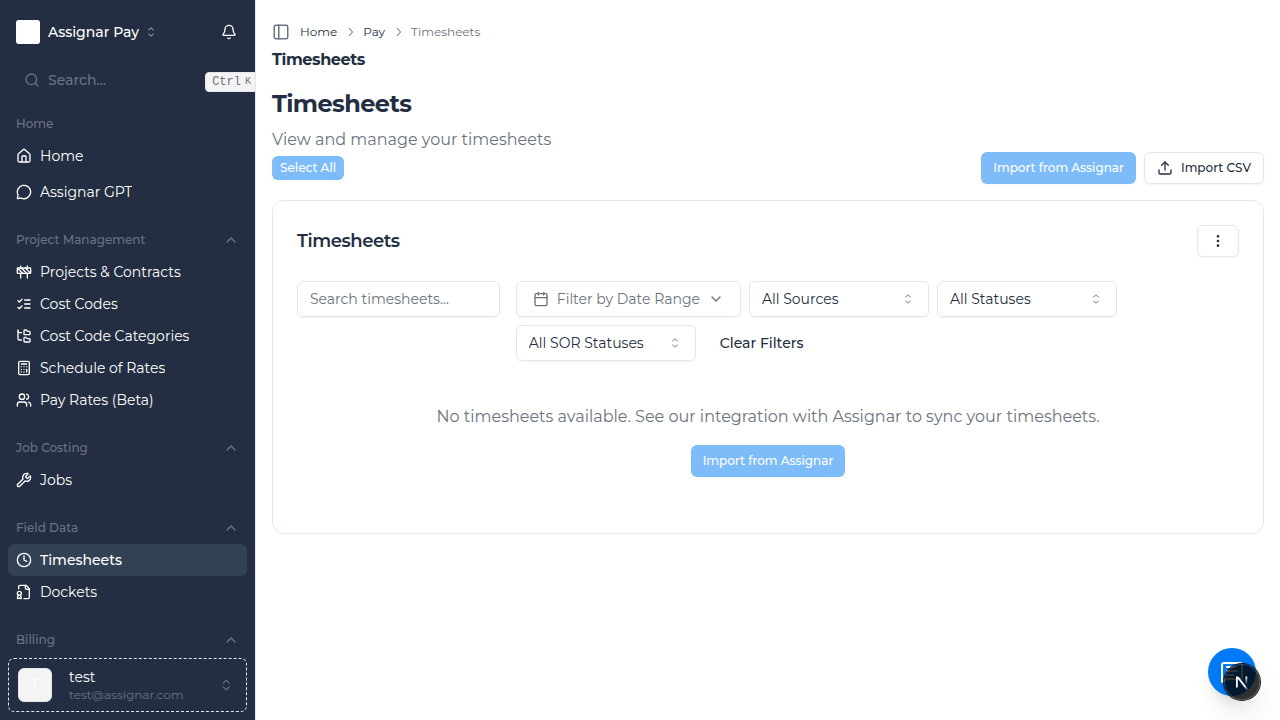
- Navigate to "Timesheets" by clicking "Field Data" in the left sidebar, then select "Timesheets"
- You'll see the main timesheets page with import buttons and filter options at the top
- If you have no timesheets yet, you'll see "No timesheets available. See our integration with Assignar to sync your timesheets"
- Set up your preferred data source:
- Assignar Operations Dashboard: Connect via Settings > Integrations for automatic sync
- CSV Import: Upload timesheet files from other time tracking systems
- ERP Integration: Connect QuickBooks, Xero, or Sage for automatic timesheet import
Required Information
Before you begin, make sure you have:
- Projects and clients set up in your system
- Cost codes configured for different types of work (e.g., "Concrete Pour", "Electrical Rough-in", "Plumbing Install")
- Schedule of Rates established with trade-specific hourly rates
- Worker information with their trade classifications (e.g., "Senior Electrician", "Apprentice Carpenter")
Day-to-Day Usage
How to Connect Assignar Operations for Automatic Import
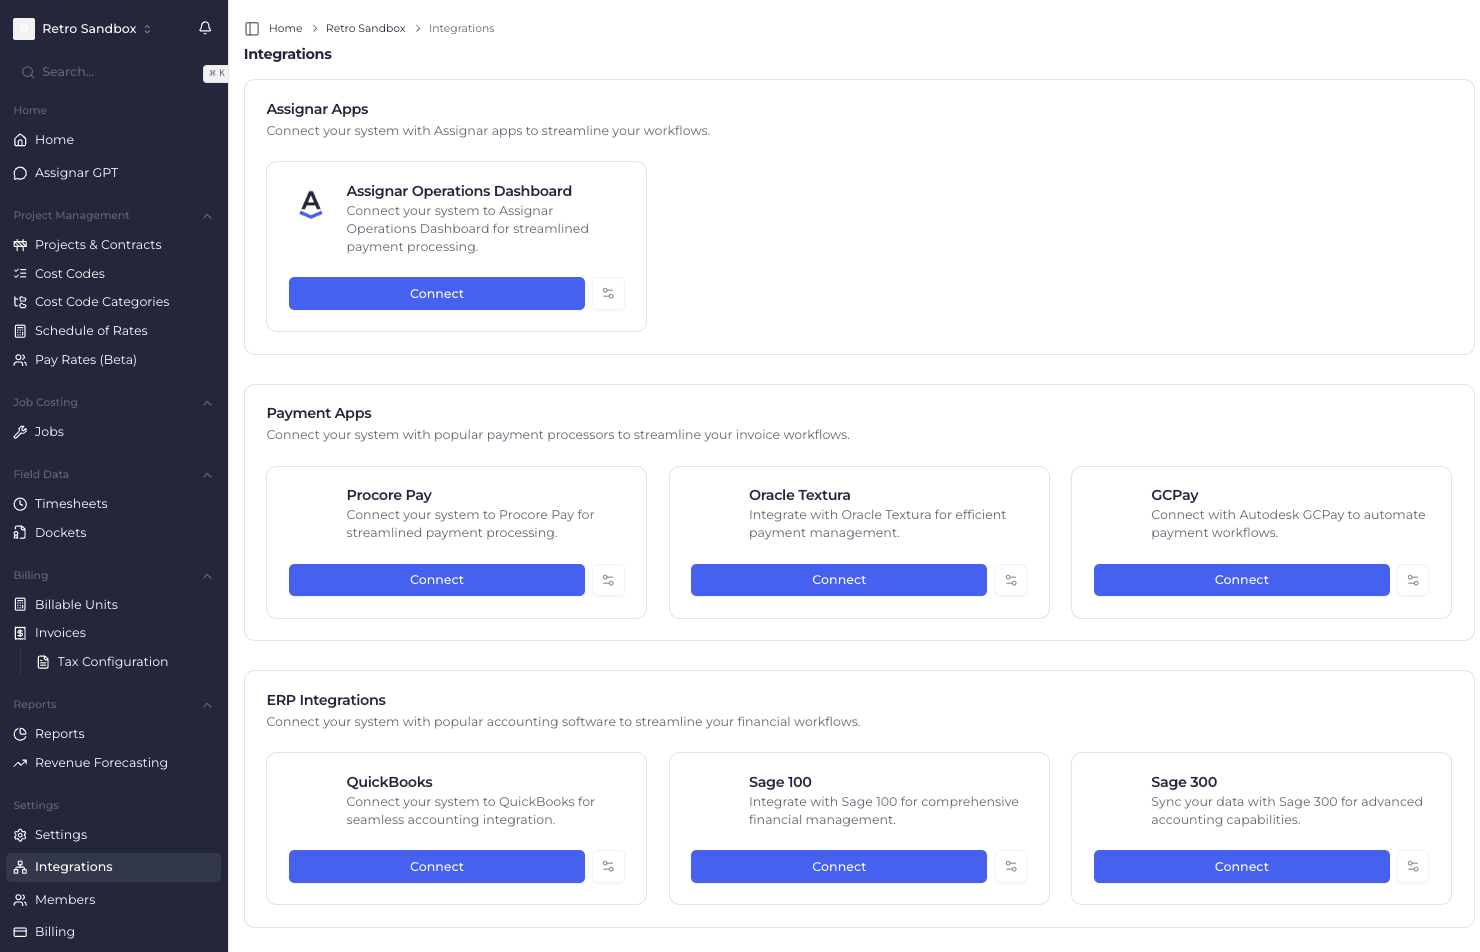
- Navigate to "Settings" in the left sidebar, then click "Integrations"
- Find "Assignar Operations Dashboard" in the "Assignar Apps" section
- Click the "Connect" button next to Assignar Operations Dashboard
- Enter your Assignar API credentials:
- Region: Select your Assignar region (Australia, United States, etc.)
- API Key: Your Assignar API key from Settings > API in Assignar Operations
- API Secret: Your Assignar API secret
- Click "Test Connection" to verify your credentials
- Once connected, click "Save Integration"
- Return to "Timesheets" page - the "Import from Assignar" button will now be enabled
- Click "Import from Assignar" to sync timesheets automatically
How to Import Timesheets from CSV
- Navigate to "Timesheets" and click the "Import CSV" button in the top right
- The CSV import modal will open with upload requirements displayed
- Your CSV file must include these required columns:
- Client or Project: To identify which construction project
- Start Time: Work start time (HH:MM format, e.g., "07:00")
- End Time: Work end time (HH:MM format, e.g., "15:30")
- Total Hours: Total hours worked (e.g., "8.5")
- Optional but recommended columns:
- Employee Name: Worker's full name (e.g., "John Smith")
- Date: Work date (YYYY-MM-DD format, e.g., "2025-08-15")
- Break Time: Break duration in minutes (e.g., "30")
- Task/Cost Code: Activity description (e.g., "Concrete Foundation")
- Comments: Additional notes (e.g., "Overtime due to weather delay")
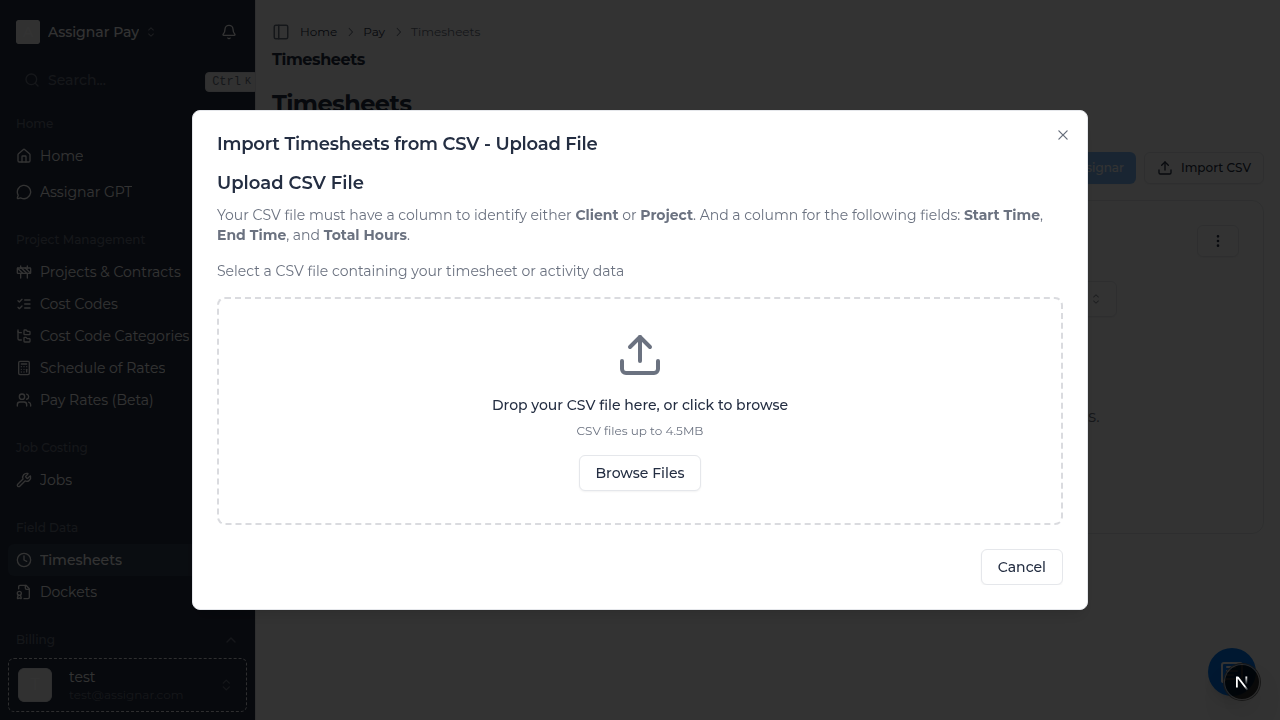
- Click "Browse Files" or drag and drop your CSV file (maximum 4.5MB)
- The system will validate your file and show a preview
- Click "Import Timesheets" to process the data
- You'll see a progress notification and summary of imported records
How to Filter and Search Timesheets
- On the main "Timesheets" page, use the search bar to find specific timesheets:
- Type employee names (e.g., "John Smith")
- Search by project names (e.g., "Downtown Office Building")
- Look for specific time periods or dates
- Use the "Filter by Date Range" button to set specific time periods:
- Click the calendar icon to select start and end dates
- Choose common periods like "This Week", "Last Month", or "This Quarter"
- Apply the filter to see only timesheets from that period
- Filter by data source using the "All Sources" dropdown:
- Assignar: Timesheets imported from Assignar Operations
- Manual: Manually entered timesheets
- QuickBooks: Imported from QuickBooks integration
- Xero: Imported from Xero integration
- Filter by status using the "All Statuses" dropdown:
- Pending: Newly imported, awaiting processing
- Processing: Currently being calculated for rates
- Completed: Processed and ready for payroll/billing
- Failed: Import or processing errors need attention
- Invoiced: Already included in client invoices
- Filter by SOR status using the "All SOR Statuses" dropdown to see rate calculation status
- Click "Clear Filters" to reset all filters and show all timesheets
Common Tasks
Bulk Processing Timesheets
- When you have multiple timesheets to process:
- Use the checkboxes next to each timesheet to select multiple entries
- Click "Select All" button to select all visible timesheets (when enabled)
- Once timesheets are selected, additional bulk action buttons will appear
- Choose your bulk action:
- Bulk SOR Processing: Apply Schedule of Rates to multiple timesheets
- Bulk Status Update: Change status of multiple timesheets
- Bulk Export: Export selected timesheets for payroll or billing
- Click "Clear Selection" to deselect all timesheets
Reviewing Individual Timesheet Details
- Click on any timesheet row to open the timesheet details panel
- Review the timesheet information displayed:
- Employee: Worker's full name who submitted the timesheet
- Date: Date the work was performed
- Hours: Total hours worked for the day
- Status: Current processing status (pending, completed, invoiced, etc.)
- Start Time: When the worker began their shift
- End Time: When the worker finished their shift
- Break Time: Duration of breaks taken (in minutes)
- Client: Which client/company the work was for
- Project: Specific construction project or job site
- Task: Type of work performed (e.g., "Concrete Pour", "Electrical Install")
- Check calculated rates and amounts if Schedule of Rates has been applied
- Review any comments or notes added by the worker or supervisor
- Verify that the cost code assignment matches the actual work performed
Handling Schedule of Rates (SOR) Matching
- Look for timesheets with "SOR Status" showing as unmatched or pending
- Click on a timesheet that needs SOR processing
- If rates haven't been calculated yet, you'll see options to:
- Auto-match SOR: Let the system automatically find matching rates
- Manual SOR Selection: Choose specific rates from your Schedule of Rates
- For automatic matching:
- The system will match based on cost codes, project type, and worker classification
- Review the suggested matches before accepting
- Click "Accept SOR Match" to apply the suggested rates
- For manual selection:
- Click "Select SOR Rate" to browse available rates
- Search by activity description (e.g., "Carpentry - Rough Framing")
- Filter by trade type or hourly rate range
- Select the appropriate rate and click "Apply"
Advanced Timesheet Management
Deleting Timesheets
- Navigate to "Pay Rates" in the left sidebar and click the "Table View" tab
- Select the timesheets you want to delete by clicking the checkboxes next to each row
- For bulk deletion, click the "Delete Timesheets" button that appears in the toolbar
- For individual deletion, click the three-dot menu (⋮) on any timesheet row and select "Delete Timesheet"
- Confirm the deletion in the dialog that appears
- Important notes about deleted timesheets:
- Deleted timesheets are removed from all modules including Job Costing and Invoicing
- Deleted timesheets will not be re-imported from Assignar Operations
- Timesheets are "soft-deleted" and can be restored if needed
Restoring Deleted Timesheets
- Navigate to "Pay Rates" in the left sidebar and click the "Table View" tab
- Click the filter icon (funnel) to open the filters popover
- Enable the "Show Deleted Timesheets" toggle - this will display only soft-deleted timesheets
- You'll see a list of all previously deleted timesheets
- To restore timesheets:
- Bulk restore: Select multiple timesheets using checkboxes, then click "Restore Timesheets"
- Individual restore: Click the three-dot menu (⋮) on any row and select "Restore Timesheet"
- Confirm the restoration in the dialog that appears
- Once restored, timesheets will be available again in all modules (Pay Rates, Job Costing, Invoicing)
- Turn off the "Show Deleted Timesheets" toggle to return to viewing active timesheets
Setting Up Automatic SOR Matching
- Go to "Settings" and click "Timesheet Settings"
Using Timesheets for Invoice Generation
- Once timesheets are processed with SOR rates, they can be used for client billing
- Navigate to "Invoices" in the left sidebar
- Create a new invoice and select the appropriate client and project
- Choose "Add from Timesheets" to include timesheet data
- Filter timesheets by date range and status (typically "Completed")
- Select the timesheets to include in the invoice
- The system will automatically calculate line items based on SOR rates
- Review the calculated amounts and add any additional charges
- Generate the invoice for client submission
Troubleshooting
If the "Import from Assignar" button is disabled
- Check that you have connected the Assignar Operations Dashboard integration
- Navigate to Settings > Integrations and verify the connection is active
- Ensure your API credentials are still valid (they may need renewal)
- Check that your account has the necessary permissions in Assignar Operations
If CSV import shows validation errors
- Verify that your CSV includes at least one column for Client OR Project identification
- Check that Start Time, End Time, and Total Hours columns are present
- Ensure time formats use HH:MM (24-hour format) like "08:00" and "17:30"
- Verify that your file size is under 4.5MB limit
- Make sure employee names exactly match users already set up in your system
If timesheets appear but SOR matching isn't working
- Verify that Schedule of Rates are set up and active in your system
- Check that cost codes in timesheets align with SOR descriptions
- Ensure workers have appropriate trade classifications that match SOR rates
- Review SOR confidence scores - low scores may require manual review
If you can't see any timesheets
- Check your applied filters - click "Clear Filters" to reset all filters
- Verify the date range filter includes the timesheet submission dates
- Ensure you have the correct permissions to view timesheets
- Check that timesheets were imported successfully (look for import notifications)
If you accidentally deleted timesheets
- Deleted timesheets are soft-deleted and can be restored
- Navigate to "Pay Rates" > "Table View" and open the filters popover
- Enable the "Show Deleted Timesheets" toggle to view deleted timesheets
- Select the timesheets you want to restore and click "Restore Timesheets"
- Note: Deleted timesheets will not be automatically re-imported from Assignar Operations, so restoration is the only way to recover them
Tips for Construction Teams
- Set up automatic Assignar imports to sync timesheets daily and catch issues early
- Train field workers on consistent cost code selection for accurate project costing
- Use the search function to quickly locate timesheets for specific workers or projects
- Review SOR matching regularly to ensure accurate client billing rates
- Export completed timesheets weekly for integration with payroll and accounting systems
- Use the comments field to document important context like weather delays or equipment issues
Best Practices for Construction Workflows
Daily Operations
- Import timesheets at the end of each day to review while details are fresh
- Check for missing timesheets from workers who were on-site
- Verify that overtime hours are properly documented and approved
- Ensure cost codes accurately reflect the work performed (e.g., separate foundation work from framing)
Weekly Review Process
- Filter timesheets by the previous week's date range
- Review all timesheets for completeness and accuracy
- Process SOR matching for any pending timesheets
- Generate payroll exports for HR and accounting teams
- Check project hour totals against estimates and budgets
Monthly Analysis
- Export timesheet data for project profitability analysis
- Review cost code usage patterns across different job sites
- Analyze worker productivity and identify training opportunities
- Compare actual hours to project estimates for future bidding accuracy
What's Next
After setting up timesheet management, you may want to:
- Configure Schedule of Rates for automatic rate calculation
- Set up Cost Codes for detailed project tracking
- Create Invoices using processed timesheet data
- Review Reports for project and labor analysis