

Review dockets
Show dockets in Schedule of Rates, find and check them, map their form fields for pricing, price them and invoice them.
A docket is the signed record of a crew's shift: who worked, their tasks and hours, and anything else the form asked. Dockets come across from Assignar Operations, or your crew fills them in on a docket form in Assignar Pay. You price them against a schedule of rates and invoice them, the same way as timesheets.
This page uses the default name, Dockets. United States and Canadian accounts see Field Tickets instead, and if your organization has set its own name under Terminology in Settings, the sidebar and screens use that. See Name your dockets.
Show dockets
Dockets have their own tab under Revenue, then Schedule of Rates, once your organization shows them:
- In the sidebar, select Settings, then General, and go to the Payroll section.
- Under Rate calculation, set Schedule of Rates Display Mode to Dockets or Both. Timesheets hides the tab.
- Select Save Changes.
If the tab is hidden and someone opens it from a link, they see Enable Dockets with a Go to Settings button.
Find a docket
Open the Dockets tab. It opens on the last 7 days, newest first, with the workers, their roles, the shift, and the project, client and order for each record.
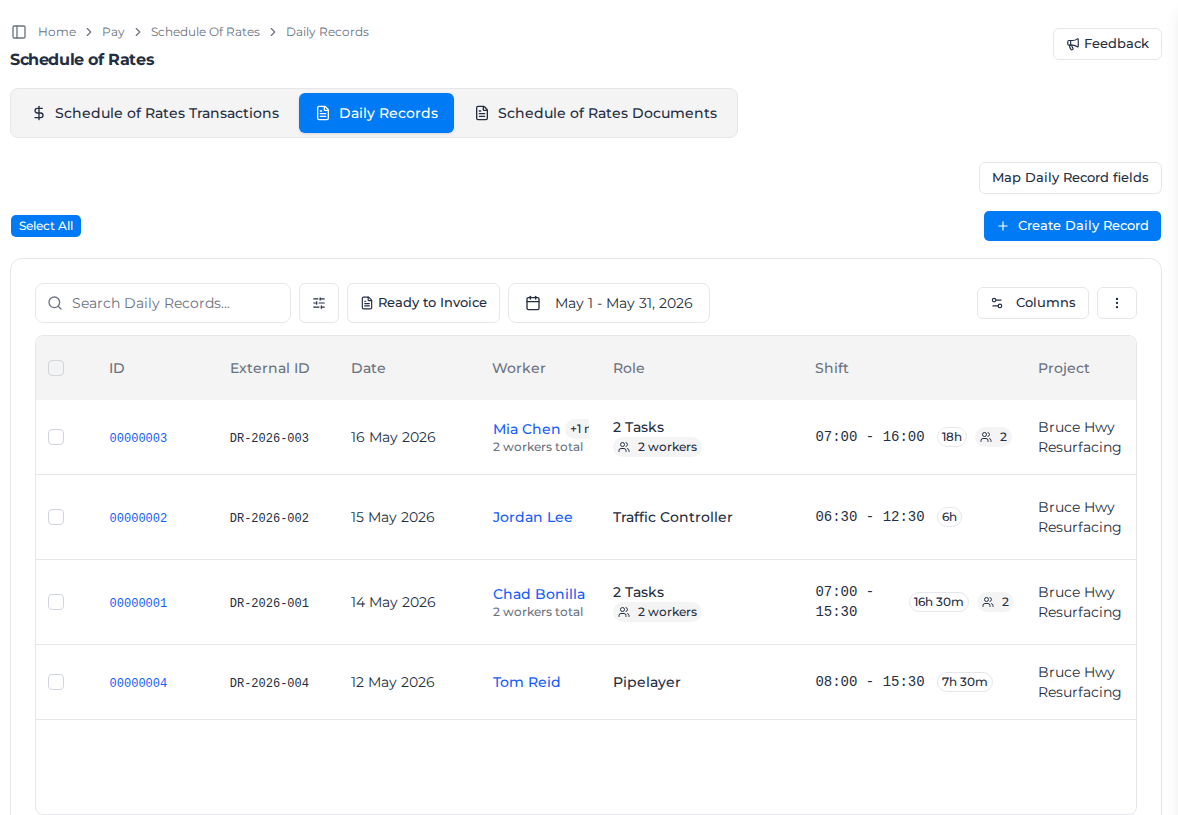
- Search Dockets... finds records by worker, task, client, project, invoice number or order, including the Assignar Operations order ID, for example
1530. - The date button changes the period.
- The filters narrow the list by Source, Status, Order Status and Invoiced Status. Under Order, each option starts with the Operations order ID, then the order description, so you can type the ID to keep only that order's records.
- Ready to Invoice shows only completed records that are not invoiced yet.
The Ops Order ID column shows the Operations order ID on each row. Select its heading to sort by it, and use Columns to show or hide it. A CSV export includes every column you have showing, so leave Ops Order ID showing if you need it in the file. The Schedule of Rates Transactions tab has the same search, Order filter and Ops Order ID column. There, picking one or more projects under Project limits Order to the orders under those projects, and changing Project removes any selected order that is not under the new projects.
To see a record in full, select ... on its row, then View Details. The panel lists each worker with their task, shift time and total time, and the answers to any custom questions on the form.
Check an imported docket against its timesheets
For organizations using Daily Records, Assignar Pay checks each docket that comes across from Assignar Operations against the timesheets Operations linked to it. The docket's hours are what you charge the client, and the timesheet's hours are what you pay the worker, so the two should agree. When they don't, the row shows N to review under the worker.
Open View Details to see which workers or machines to check. Under each one you see:
- Docket 8 h · Timesheet 7.5 h when the timesheets linked to the docket for that worker or machine add up to different hours on that day.
- No linked timesheet when Operations hasn't linked a timesheet for that worker or machine on that day. A timesheet the worker filed for the same day counts only once Operations links it to the docket.
Nothing is changed for you: the docket still charges its own hours. Check the hours with your crew and correct the docket or the timesheet before you invoice.
Map a form's fields for pricing
Custom questions on a docket form, such as a crew size, travel hours or materials used, only change the price once you say what each one means.
- Select Map Docket fields.
- Choose the Schedule of rates and the Docket template.
- Select Suggest mapping to have Assignar Pay suggest one, or Map manually.
- For each field, choose what it Maps to, for example Crew size (family rate) or Travel hours.
- Select Run price preview to price a sample record, check the total, then select Save mapping.
You need an active schedule of rates first; see Set up a schedule of rates. A form with no custom questions still needs its empty mapping saved before its records can be priced.
Price and invoice dockets
- Tick the records you want, or select Select All.
- Select Process SoR (N) to price them against your schedule of rates. The SoR Status column shows the result.
- Select Create Invoice (N Dockets) to start an invoice from them.
You can also add priced dockets to a draft invoice with Add from Dockets. Each worker's hours come in as their own lines, and so do the record's materials and fixed fees, such as mobilisation. See Create and send invoices.
Add a docket
Select Create Docket, choose a published docket form, and select Continue. Assignar Pay opens the form for you to fill in. If you have none, the dialog says No published Docket forms are available. Publish a Docket form first. and Open Forms takes you to your forms.
If you use Assignar Operations, the tab also has Import Dockets for bringing them across; see Connect with Operations.
To remove a record, select ... on its row, then Delete.
Let workers capture paper dockets
Crews who still fill in paper can photograph it from the mobile app. Turn paper capture on for your organization, then for each project that uses it. Both start off.
- In Settings, under Operations, open Paper Dockets. Turn on Enable paper Dockets and select Save paper Docket settings. You need permission to manage settings.
- Edit each project that uses paper. In Details, turn on Paper Dockets and select Update. You need permission to update projects.
Anyone assigned to a shift on an enabled project can then capture a paper docket from My Shifts in the mobile app. Publish a docket form in Forms so the office can read the uploads into it.
Turning the organization setting off stops new captures on every project. Your project choices and existing uploads are kept, and the uploads can still be reviewed.
Read photos on Ops Dockets
Photos taken on a docket in Assignar Operations can be read into Pay and reviewed like a paper docket. Once those dockets have synced, Settings, under Operations, Paper Dockets shows Photos on Ops Dockets below Enable paper Dockets. You need permission to manage settings.
- Under Ops Docket templates, choose the templates whose photos Pay should read. Each one is listed as Template and its number.
- Under Read into, choose the published docket form those photos fill.
- Select Save. Pay reads the JPEG, PNG and WebP photos already stored on those templates, and photos that sync in later on the same templates.
You see Saved. Reading photos already in Pay. The photos wait under Paper Dockets with status Needs review. Select Review and check the form the same way as an uploaded paper docket. The review shows Ops Docket and the number of the Operations docket the photo came from. Submitting it can add a Docket alongside that Operations docket.
To stop new photos being read, clear Ops Docket templates and select Save. You see Saved. Photos already waiting for review stay in the list.
| Message | What to do |
|---|---|
| No published docket template. | Publish a docket form in Forms, then choose it under Read into. |
| Saved, but the import did not start. Save again to retry. | Select Save again. The templates and form are already stored. |
| Could not save. Try again. | Select Save again. |
| Could not load the Ops photo setting. | Select Retry. |
Read a paper docket into a record
When you have completed paper dockets to enter, upload a photo or PDF of each one. Assignar Pay reads each file into a docket form for you to check. You need permission to create timesheets and a published docket form.
- On the Dockets tab, select Upload paper Docket.
- Choose the Template the paper should fill. Your account's default form is selected when there is one, and that template is used for every file you add. Select Choose files and pick one or more photos or PDFs, up to 40 files and 25 MB each. You can also drop the files on the page, then select Upload.
- One file opens that upload. Several files stay where you are, and each one shows its own progress. Select a file's name to open that upload. A file that is the wrong type, is over 25 MB, is past the 40-file limit, or fails to upload is marked on its own; the rest still upload. A file you already uploaded shows Already uploaded and keeps the existing upload. Files you drop while a batch is still uploading wait, and the dialog says how many. Wait until an upload reaches Needs review, then open it and select Review. Reading can take a minute. You can leave and come back through Paper Dockets, which lists every upload with its status.
- Compare every answer with the photo beside the form. Check these points you to names that couldn't be matched. Complete any required fields the paper didn't supply. If the sheet's date differs from the record's, a warning says so; check it's the right sheet.
- To read small handwriting, select the photo or the expand button above it. The photo opens full size, where you can zoom, drag and rotate it.
- Submit the form. The upload becomes Confirmed, and Open the record takes you to the saved record.
The photo or PDF stays on the record, signatures included, under Original paper Docket. Select View to open it full size. Anyone who can view timesheets can open it, as can the person who uploaded it. Nobody can replace or delete it.
If you see In review by and a colleague's name, they have already opened the review. Let them finish, or select Discard to abandon the upload. A discarded upload writes nothing to a docket, and its review form can no longer be submitted.
| Message | What to do |
|---|---|
| That file is larger than 25 MB. | Choose a smaller photo or PDF. |
| Choose a photo or a PDF. | Save the file as a photo or a PDF, then upload it again. |
| Only 40 files can be uploaded at once. | Upload the rest in another batch. |
| The upload failed. Try again. | Upload that file again. |
| This account has no published Docket template, so a paper Docket cannot be read yet. | Publish a docket form in Forms, then upload again. |
| This Docket could not be read | Upload the photo again, or enter the record yourself with Create Docket. |