

How to Use API Keys
Step-by-step guide to creating, managing, and using API keys for Assignar Pay API access
What This Feature Does
API keys provide secure, programmatic access to the Assignar Pay API. They allow you to integrate Assignar Pay with your existing systems, build custom applications, and automate workflows. Each API key has configurable permissions (scopes) and optional expiration dates.
Initial Setup
Accessing API Keys
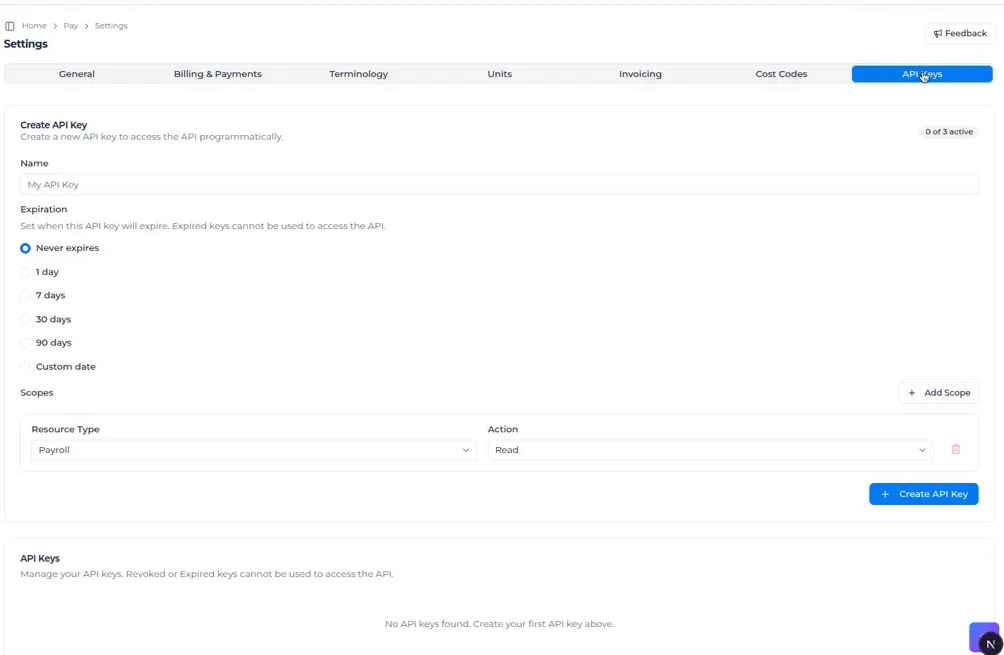
- Open Settings from the left sidebar
- Select the API Keys tab
The /api-keys route redirects to Settings with the API Keys tab selected (?tab=apiKeys).
Required Permissions
The API Keys tab is available to workspace Owners and Admins, who can also create and revoke keys. Other roles don't see the tab, and users on the Field role can't open Settings at all.
Your workspace also needs an active subscription. If it doesn't have one, the tab still opens and existing keys stay listed, but the create form and the revoke buttons are read-only until billing is resolved.
Day-to-Day Usage
How to Create an API Key
- Open Settings → API Keys
- Use the Create API Key card at the top of the page (the badge shows how many of the 3 active-key slots are used)
- Enter a Name (placeholder: My API Key)
- Choose Expiration:
- Never expires
- 1 day, 7 days, 30 days, or 90 days
- Custom date (opens a date picker; Pick a date)
- Configure Scopes:
- One scope is added by default (Payroll + Read)
- Click Add Scope to add another
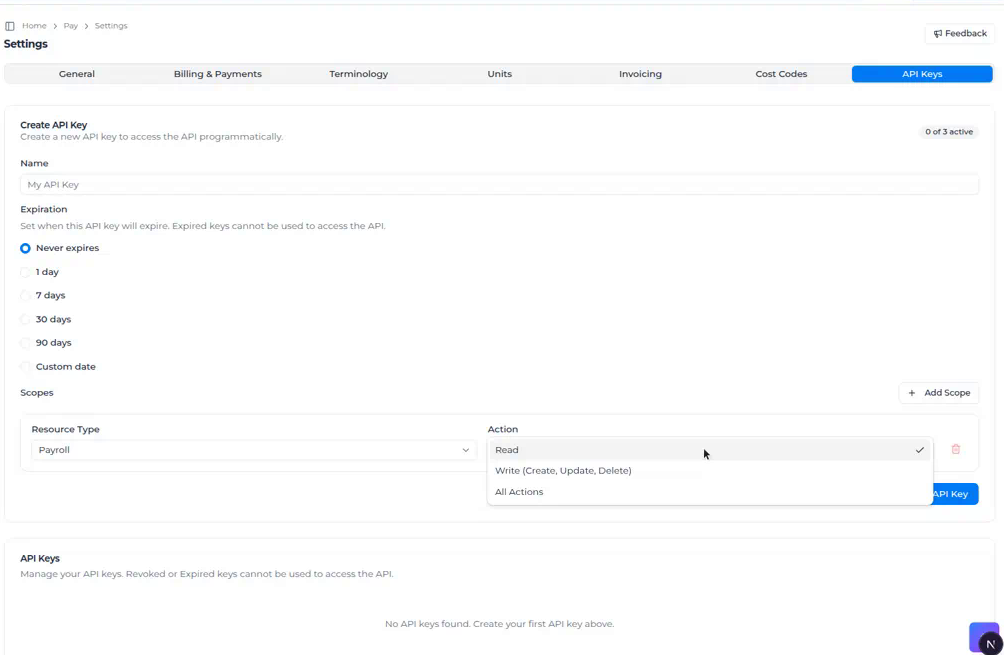
- For each scope, choose Resource Type (Payroll, Reference Data, or Accounting) and Action (Read, Write (Create, Update, Delete), or All Actions)
- Remove a scope with the trash icon (at least one scope is required)
- Click Create API Key
- In the API Key Created dialog, copy the key immediately. The dialog says You won't be able to see it again! Use I've copied the key when you are done
If you already have 3 active keys, the form shows API Key Limit Reached and Create API Key is disabled until you revoke one.
How to Use Your API Key
Once you have your API key, include it in API requests using one of these methods:
Method 1: X-API-KEY Header (Recommended)
# Fetch pay rates (requires payroll:read scope)
curl -X GET "https://pay.assignar.com/api/v1/pay-rates" \
  -H "X-API-KEY: sk_your_api_key_here"

# Fetch cost codes (requires reference_data:read scope)
curl -X GET "https://pay.assignar.com/api/v1/cost-codes" \
  -H "X-API-KEY: sk_your_api_key_here"
Method 2: Authorization Bearer Header
curl -X GET "https://pay.assignar.com/api/v1/pay-rates" \
  -H "Authorization: Bearer sk_your_api_key_here"
If both headers are sent, X-API-KEY is used.
JavaScript/TypeScript Example
const headers = {
  'X-API-KEY': 'sk_your_api_key_here',
  'Content-Type': 'application/json',
};

// Fetch pay rates (requires payroll:read scope)
const payRates = await fetch('https://pay.assignar.com/api/v1/pay-rates', {
  headers,
});

// Fetch cost codes (requires reference_data:read scope)
const costCodes = await fetch('https://pay.assignar.com/api/v1/cost-codes', {
  headers,
});
Python Example
import requests

headers = {
    'X-API-KEY': 'sk_your_api_key_here',
    'Content-Type': 'application/json',
}

pay_rates = requests.get(
    'https://pay.assignar.com/api/v1/pay-rates',
    headers=headers
)

cost_codes = requests.get(
    'https://pay.assignar.com/api/v1/cost-codes',
    headers=headers
)
How to View Your API Keys
- Open Settings → API Keys
- Scroll to the API Keys card below the create form
- The table shows:
- Name
- Key Prefix (first characters of the key, followed by
...) - Scopes (shown as
resource:action, or a count when the key has more than one) - Created
- Last Used (date and time, or Never)
- Expires (date, or Never)
- Status: Active, Expired, or Revoked
- Actions
Rows use a left border: green for active, amber for expired, and red for revoked. Keys expiring within 7 days show an info icon with Expires tomorrow or Expires in N days.
How to Revoke an API Key
- Open Settings → API Keys
- Find the key in the list
- Click the trash icon in Actions (shown on Active and Expired rows you can delete; revoked keys have no trash icon)
- Confirm in the Revoke API Key dialog, then click Revoke
Revoking a key immediately stops it from working. This cannot be undone.
Common Tasks
Setting Up Different Keys for Different Environments
- Create separate API keys for development, staging, and production
- Use descriptive names that include the environment and the application
- Set shorter expiration dates for development keys
- Use more restrictive scopes for development keys
Creating Keys with Limited Permissions
- When creating a key, only add the scopes you need
- For read-only integrations, use Read
- For mutations, use Write (Create, Update, Delete) — this also allows GET
- Avoid All Actions unless you need every action on that resource type
Managing Key Expiration
- For production integrations, use Never expires or 90 days
- For temporary scripts or testing, use 1 day or 7 days
- Monitor expiration dates in the API keys list
- Keys expiring within 7 days show an info icon
- Create a replacement key before expiration to avoid service interruption
Rotating API Keys for Security
- Create a new API key with the same scopes
- Update your application to use the new key
- Test that everything works with the new key
- Revoke the old key once the new one is confirmed working
- Repeat this process regularly (for example, every 90 days)
Advanced API Key Management
Understanding Scopes
Scopes define what your API key can access. Each scope combines a resource type with an action.
Available Resource Types
| Scope | Endpoints | Description |
|---|---|---|
payroll | GET /api/v1/pay-rates | Payroll timesheets and calculated pay rate data |
reference_data | /api/v1/cost-codes (GET, POST, PATCH, DELETE, plus categories, subcategories, and batch) | Cost codes, categories, and subcategories |
accounting | GET /api/v1/invoices, GET /api/v1/invoices/{id} | Invoices and related data |
Available Actions
- Read (
read): GET endpoints only - Write (Create, Update, Delete) (
write): POST, PATCH, and DELETE, and also GET - All Actions (
*): every action on that resource type
Common Integration Scenarios
- Payroll integration (Xero/QB payroll sync):
payroll:read - ERP cost code sync (read):
reference_data:read - ERP cost code sync (write):
reference_data:write - Accounting integration (invoice sync):
accounting:read - Full access: one scope per resource type you need, with
*only if write is required
Scopes gate which endpoints you can call, not which fields appear in responses. Responses may include contextual references to other entities (for example, cost code names in pay-rate responses) without requiring a separate scope.
API Key Limits
- Maximum of 3 active API keys per account
- If you reach the limit, revoke an unused key before creating a new one
- Expired or revoked keys do not count toward the limit
Key Status Indicators
- Green left border: Active key that has not expired
- Amber left border: Key that has expired but has not been revoked
- Red left border: Key that has been revoked
- Info icon: Key expiring within 7 days
Troubleshooting
If your API key isn't working
- Verify the key is copied correctly (no extra spaces or characters)
- Check that the key status is Active
- Ensure the key hasn't expired
- Verify you're using
X-API-KEYorAuthorization: Bearer - Check that your scopes include the required permission for the endpoint (
payroll:read,reference_data:read/reference_data:write, oraccounting:read)
If you can't create a new API Key
- Check whether you have reached 3 active keys
- Revoke an unused or expired key to free a slot
- Confirm you are an Owner or an Admin on this workspace
- Check that your workspace subscription is active — the create form and the revoke buttons are read-only while it isn't
If you lost your API key
- API keys are only shown once, in the API Key Created dialog
- If you didn't copy it, create a new key
- Revoke the old key if you suspect it was compromised
If an API key expired unexpectedly
- Check Expires in the API keys list
- Create a new key with a longer expiration or Never expires
- Update your application to use the new key
- Revoke the expired key once migration is complete
Tips for Secure API Key Usage
- Never commit API keys to version control — use environment variables
- Use different keys for different applications — easier to revoke access if needed
- Set expiration dates — even for production keys, consider setting an expiration
- Monitor last used dates — revoke keys that have not been used
- Use minimal scopes — only grant the permissions you need
- Rotate keys regularly
- Store keys securely — not in plain text files
Best Practices for API Key Setup
Naming Conventions
- Use clear, descriptive names that indicate the key's purpose
- Include environment information (dev, staging, prod)
- Include the application or service name
Scope Management
- Start with Read and add Write only when needed
- Use separate keys for different applications or services
- Review scopes regularly
Expiration Strategy
- Production keys: 90 days or Never expires
- Staging keys: 30 days
- Development keys: 1 day or 7 days
- Temporary scripts: Custom date matching the project timeline
What's Next
After setting up API keys, you may want to:
- Explore the API Documentation to see available endpoints
- Review example requests on API Integration
- Configure your application to handle 429 responses using the
Retry-Afterheader